|
|
Post by Clasec on Mar 8, 2018 23:31:21 GMT -5
I found the hole for the fuel line - it's under the oil lines.Talk about a stupid place to put the hole,you'd think it'd be above the oil lines for easy access,but so far they picked the wrong name for the saw.It might be super easy to start & operate,but it sure as hell isn't easy to work on or repair.The reason why I couldn't find out where the fuel line attached to the carb was because there was black residue left on the inlet & it looked like an adjustment screw.(yeah people go ahead & laugh) I had the carb separated from the reed block,but I couldn't get the carb to lift out.It's almost as if I've got to take the rear handle apart to get the carb off,or remove the airbox,then it MIGHT come off.But there's no way to remove the rear handle that I'm aware of unless I tear down the saw completely,& that doesn't make sense to me.Of courser the way a lot of these saws are put together doesn't make sense to me. It looks like you're making progress. It is interesting to me how much Homelite changed things on saws that look almost identical. I've not removed the carburetor on my EZ so I'm no help there. Charles. |
|
Deleted
Deleted Member
Posts: 0
|
Post by Deleted on Mar 9, 2018 8:53:49 GMT -5
I'm not making any progress whatsoever.I can't fish the oil line out of the tank,I can't get the carb off,& I can't get the oil fittings apart enough to check the check valves.Just about giving up on this one.
|
|
|
|
Post by sweepleader on Mar 9, 2018 10:53:27 GMT -5
I can't say much about the EZ, I have never worked on one. I can say that the screws that hold the carb on an SXL like to stay in the carb as it comes off, maybe that is the case with the EZ too. The reed block may or may not need to come off with the carb, I would try both ways if one did not work.
Fishing the oil line out might be easier if the tank was flushed first with some gas, to clear the sticky oil. I have several forceps and LONG needle nose pliers that I might try. I might also try to screw a 3 or 4 inch wood/deck screw into the end of the oil hose to get it out. It might respond to inverting the oil tank and randomly wiggling a wire around in there, hoping the oil line would find the hole and drop out by gravity. Inserting a wire in the end of the line and inverting the tank could also guide it out.
Don't give up, it's a Homelite you are trying to save.
|
|
|
|
Post by undee70ss on Mar 9, 2018 11:12:39 GMT -5
I'm not making any progress whatsoever.I can't fish the oil line out of the tank,I can't get the carb off,& I can't get the oil fittings apart enough to check the check valves.Just about giving up on this one. I can scan/post the service manual if interested but it will have to wait till sometime this weekend. |
|
|
|
Post by undee70ss on Mar 9, 2018 11:15:17 GMT -5
I believe leon has some videos on how to take these apart, they are SEZ’s not a EZ, but they are about the same.
|
|
Deleted
Deleted Member
Posts: 0
|
Post by Deleted on Mar 9, 2018 11:27:19 GMT -5
That's fine Greg,I'm getting nowhere now,so a little wait isn't gonna hurt.
|
|
Deleted
Deleted Member
Posts: 0
|
Post by Deleted on Mar 9, 2018 12:56:05 GMT -5
Dan,I've tried every which way from Sunday to get that obstinate oil line out of the tank.I had a hold of it when I originally started on the saw & was able to get the oil filter off to see if it was plugged - it wasn't,but I lost the line back into the tank in the process.I've always used a hooked wire to latch onto the oil line withouth a problem,but this one is a giant pain.I can't even see the line by shining a light in the tank like I normally do.
As for the carb removal - I was able to loosen the carb bolts entirely,but as you said,they want to stay in the carb because there isn't enough room for them to come out completely.I was able to dislodge the carb from the reed block.How does the throttle linkage unhook?
I found an old exact post like mine on AS from 2009 about the manual oiler not working.He was able to resolve his problem by putting gas down the hole for the pump rod & then blow air into it.Mine is a little different in that the check valve(s) might be stuck.There is no way to access either check valve unless I disassemble the entire saw.Is the top elbow for the intake check valve pressed into place or screwed in?If it's screwed in then I'm screwed as well because the elbow CANNOT unscrew from the manual oiler because there is NO clearance,it's up tight against the airbox wall. You can see what I'm talking about by looking at the pics I posted yesterday.
|
|
|
|
Post by sweepleader on Mar 9, 2018 13:17:42 GMT -5
Sorry, I only have general suggestions as I am not familiar enough with the saw to give you specifics.
I went back to the beginning of this thread to see that fossil asked about the fitting in the very first response to your question, you must have missed the fitting in your inspection of the saw.
Looking at the IPL and the trouble shooting stuff that undee included above, it looks to me like there is indeed a fitting at the tank that the oil line from the pump connects to and a short piece inside the tank that the filter goes to.
Follow the line from the pump to the tank fitting, disconnect it and unscrew the fitting from the tank. It should bring the in tank line out with it. It looks like the oil filter will fit through the hole that the fitting is in when replacing.
Check the lines for cracks or splits, replace as needed, install the filter in the tank line and reassemble.
Undee's stuff above and the IPL also shows the oil pump and the check valves in detail. The pump fittings have to press in, they go directly into the casting so if there is not room to unscrew them, they must be pressed in place.
The carb linkage likely has a 90 degree turn near the end that goes through the throttle lever on the carb, then a 45 degree turn at the very tip to retain the rod in the lever. The carb may have to be turned to one side to unhook the rod from the lever.
I repeat that I do not know much about this model saw, I have never worked on one. My suggestions regarding pulling out the oil line relied on your description of the original problem, not my knowledge directly of the saw. Sorry to have misled you.
|
|
|
|
Post by chainsawlady on Mar 9, 2018 13:35:06 GMT -5
I found the hole for the fuel line - it's under the oil lines.Talk about a stupid place to put the hole,you'd think it'd be above the oil lines for easy access,but so far they picked the wrong name for the saw.It might be super easy to start & operate,but it sure as hell isn't easy to work on or repair.The reason why I couldn't find out where the fuel line attached to the carb was because there was black residue left on the inlet & it looked like an adjustment screw.(yeah people go ahead & laugh) I had the carb separated from the reed block,but I couldn't get the carb to lift out.It's almost as if I've got to take the rear handle apart to get the carb off,or remove the airbox,then it MIGHT come off.But there's no way to remove the rear handle that I'm aware of unless I tear down the saw completely,& that doesn't make sense to me.Of courser the way a lot of these saws are put together doesn't make sense to me.I'm seriously thinking of getting rid of all the saws I bought over the last yr.& cut my losses while I'm ahead.I don't need the aggravation or the never ending costs involved.I thought I might ber able to supplement my income,but so far all I've done is buy parts. I still think your saw is an EZ. It is like the one Clasec has pictured. It looks like someone has replaced the outer plate on the starter taken from a Super EZ. Your saw should have a metal tag attached to show what model your saw is. Until that is determined it will be difficult to get the correct parts. chainsawlady |
|
|
|
Post by walterg on Mar 9, 2018 13:36:53 GMT -5
The inlet check valve is pressed in, the outlet check valve is screwed in.
|
|
Deleted
Deleted Member
Posts: 0
|
Post by Deleted on Mar 9, 2018 15:21:53 GMT -5
As I stated yesterday,the UT# is 10100,I had the numbers reversed,I guess my memory isn't as good as it used to be.I posted pics of the tags,here they are again. I found out on my own that the inlet check valve is pressed in,not screwed in.I'm able to blow through it by mouth both ways,as far as I know it's only supposed to be able to have air blow through it one way.This tells me that the check valve for the inlet is no good. I got the bolts out of the carb finally,the only thing holding me up from getting the carb out is that darned linkage.I've tried twisting & turning it every which way to get the linkage to come out of the carb - still no luck 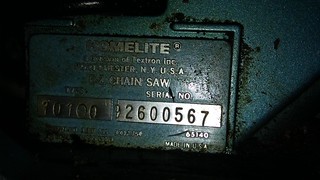 20180308_190642 20180308_190642 by edju1958, on Flickr  20180308_190452 20180308_190452 by edju1958, on Flickr |
|
Deleted
Deleted Member
Posts: 0
|
Post by Deleted on Mar 9, 2018 16:54:37 GMT -5
Update on EZ
I finally got the carb off,after wrestling with it for awhile I tipped the saw over to get a better look & the carb FELL OFF.I need to know if the fuel line has a grommet that it fits through where it comes into the airbox?
I still don't know which oil line I need to pull through into the airbox.If it's the one with all the fittings on - there's no way.If it's the other rubber like line that goes through a grommet - that one might pull through,but it might break in the process because of it's age.Today I definitely made some progress! Thank you everyone for your help thus far!
|
|
|
|
Post by fossil on Mar 9, 2018 16:59:06 GMT -5
Dan,I've tried every which way from Sunday to get that obstinate oil line out of the tank.I had a hold of it when I originally started on the saw & was able to get the oil filter off to see if it was plugged - it wasn't,but I lost the line back into the tank in the process.I've always used a hooked wire to latch onto the oil line withouth a problem,but this one is a giant pain.I can't even see the line by shining a light in the tank like I normally do. As for the carb removal - I was able to loosen the carb bolts entirely,but as you said,they want to stay in the carb because there isn't enough room for them to come out completely.I was able to dislodge the carb from the reed block.How does the throttle linkage unhook? I found an old exact post like mine on AS from 2009 about the manual oiler not working.He was able to resolve his problem by putting gas down the hole for the pump rod & then blow air into it.Mine is a little different in that the check valve(s) might be stuck.There is no way to access either check valve unless I disassemble the entire saw.Is the top elbow for the intake check valve pressed into place or screwed in?If it's screwed in then I'm screwed as well because the elbow CANNOT unscrew from the manual oiler because there is NO clearance,it's up tight against the airbox wall. You can see what I'm talking about by looking at the pics I posted yesterday. Ed, Check out these photo's Fuel line into tank just pulls through the grommet in the tank. The oil line can be pulled out of the tank by removing the fitting circled on the right. app.box.com/s/9ydk6ith37gfjr85l71j2ewxdc90z3fkThe oil pump check valve is circled here No need to remove it to check if it's working. Pull the black oil line off it and attach a length of fuel line to the fitting. You should be able to blow through the fitting but you should not be able to suck through it. Careful not to eat any bar oil. app.box.com/s/s0ahl2b3jub7mfkbzc0xo8b1ibyvbzeiThese are stored on a cloud site so the links will take you to the photos. Let me know if they don't work and I'll email them to you. You can download them to your computer and zoom in if you can't see them as is. |
|
Deleted
Deleted Member
Posts: 0
|
Post by Deleted on Mar 9, 2018 18:52:57 GMT -5
Thanks Tim,I've determined that this check valve is no good because I can blow through it & suck air through it as well.I think the saqme for the check valve in the tank because I can blow & suck through that as well.Also,the grommet forthe gas tank that the line goes into is shot,it's nothing but sticky goo.I need a bunch of parts for this saw to get it up & running again.There is one plus,I already have a carb kit for it & I might have some fuel line too.Lol So far this saw was the most challenging,only because I didn't have any pics to go by til you showed them to me.A BIG thank you Tim! What should I use to wash the fuel tank out with to get that goo out? 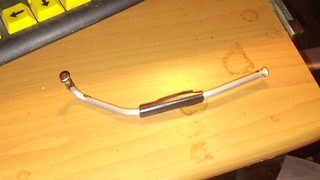 20180309_183816 20180309_183816 by edju1958, on Flickr 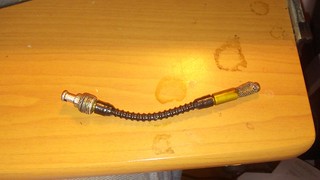 20180309_183710 20180309_183710 by edju1958, on Flickr |
|
Deleted
Deleted Member
Posts: 0
|
Post by Deleted on Mar 9, 2018 19:13:56 GMT -5
Also,after loking at the downloads you sent me Tim,& the pics that Charles (Classec) sent to me of his saw,I noticed that the fuel line comes through the front of the airbox.My saw has no hole in the front of the airbox for a fuel line to come in that way.I have two holes on the left side of the airbox,but there's no grommet there for a fuel line,it could've fallen off or disintegrated over the yrs.,don't know.I'll take some pics later.I keep forgetting that I'm supposed to be resting.
|
|
|
|
Post by fossil on Mar 9, 2018 21:34:46 GMT -5
Also,after loking at the downloads you sent me Tim,& the pics that Charles (Classec) sent to me of his saw,I noticed that the fuel line comes through the front of the airbox.My saw has no hole in the front of the airbox for a fuel line to come in that way.I have two holes on the left side of the airbox,but there's no grommet there for a fuel line,it could've fallen off or disintegrated over the yrs.,don't know.I'll take some pics later.I keep forgetting that I'm supposed to be resting. As for the check valve, spray some WD 40 or similar stuff into the valve. Usually it's just crud in there keeping it open. The rubber fuel lines were much fatter than the Tugon line. If you can't locate any Homelite fuel line, a few wraps of Teflon plumbing tape will take up the space around the Tygon where it passes through the air box. Fuel or oil doesn't bother that tape |
|
Deleted
Deleted Member
Posts: 0
|
Post by Deleted on Mar 9, 2018 23:38:51 GMT -5
That's one of the first,if not the first thing I did.I'll spray more in it tonight before bed & let it work in overnight.I'll see what happens tomorrow.Maybe I can save a few bucks.
|
|
Deleted
Deleted Member
Posts: 0
|
Post by Deleted on Mar 10, 2018 17:12:21 GMT -5
OK gang,let's fgure this one out.I got a new spring for the manual oiler off Ebay for free.It came out of a SEZ,he threw it in for free after I bought the filter cover,filter cover bracket,& the air filter (nice guy).The original spring did NOT have an O ring on it & there was NOT even a groove for an O ring.When I put the new spring in the oil plunger hole it got hung up on something & I had to really work at it to get it out.I have a new check valve coming off the Bay for less than $5 for the oiler because after everything I tried,I just couldn't get the original check valve to work.I don't know if I could've used Acetone/Atf 50/50 or not,I don't know what's in the check valve that makes it work.Anyway,here are pics of the oil pump springs. 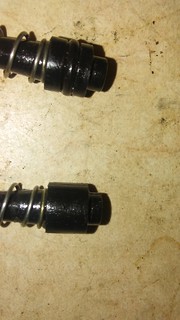 20180310_131951 20180310_131951 by edju1958, on Flickr 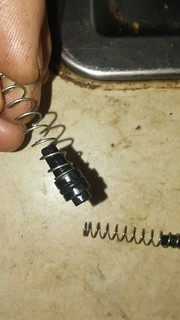 20180310_132123 20180310_132123 by edju1958, on Flickr 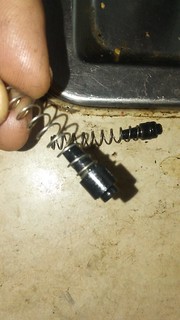 20180310_132134 20180310_132134 by edju1958, on Flickr |
|
|
|
Post by sweepleader on Mar 10, 2018 18:38:40 GMT -5
The check valve will have a small spring and a ball. The ball seats over a hole to prevent flow in one direction and the spring allows it to unseat to allow flow in the other direction (toward the bar).
Maybe the plunger you got with the ring on it was worn out and the ring was installed to "fix" it.
|
|
Deleted
Deleted Member
Posts: 0
|
Post by Deleted on Mar 10, 2018 19:01:51 GMT -5
Dan,you misunderstood what I said.I said the original spring did not have an O ring on it,nor is there a groove on it where an O ring should go (look at the pics).I took the nut off that holds the plunger in because the original plunger was broke off flush with the nut.I put another newer plunger in (it was the same as the original plunger),it still didn't work.I got another spring (it's different because it has an O ring on it) & I put that spring in the plunger hole.It still didn't work,so I went to take it back out.Apparently the newer spring with the O ring on it (at the end) is somehow different,that's why it got hung up on something when I went to take it out.
The check valve is siezed on the inside with the sprng & ball.I soaked it in WD40,as suggested.I even went in there with an ice pick to try to get something to move - nothing.I can still blow & suck through it.
Now I'm hoping that there's nothing wrong with the outlet check valve that allows oil to go to the bar,because there's no way that those fittings come apart.
|
|


