|
|
Post by lesorubcheek on Aug 5, 2018 16:39:06 GMT -5
A few years ago, I was fortunate enough to add a 3100 to the project pile. First thing I did was strip it down to see what needed attention. Overall, not bad shape, but the piston had some pitting and the auto oiler was stuck. After gathering dust for a while, finally decided it was time to start working on it and figured might as well post some pics along the way. It's gonna be a slow process, but might as well get started or it's never gonna happen. Thought it'd be good to start with a little history. Can't tell you exactly when the first 3100 was sold, but there's mention of it in the May, June, July 1970 edition of Sawdust. Here's a price list from June 1971. 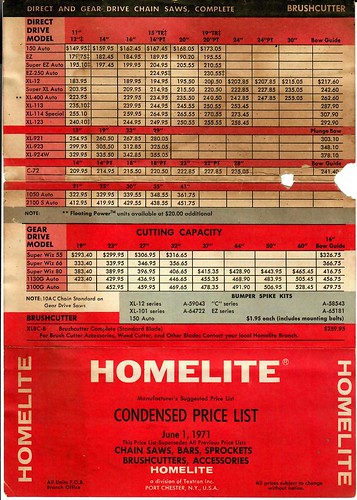 price list 1971 price list 1971 Just imagine, for $23 more than an 1130, you could drive home with a nice new 3100 with a 23" bar! Not positive, but it looks like Homelite provided a universal owner's manual for it. I've never seen a specific 3100 owner's manual before. Here's the cover with a pic of a 3100 among other models. 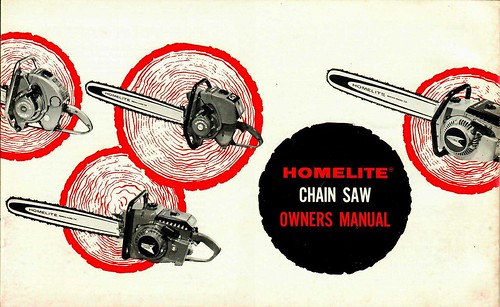 manual manualThere was a spec sheet. 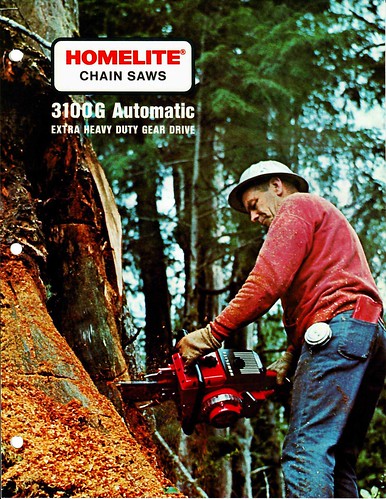 3100 spec1 3100 spec1 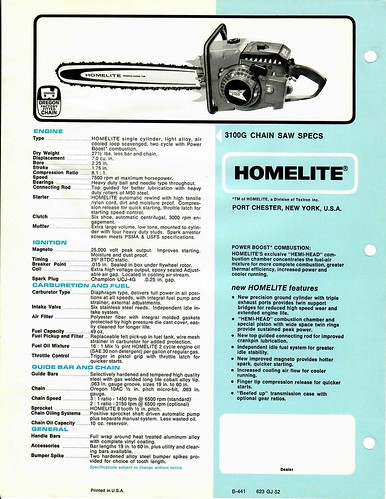 3100 spec2 3100 spec2and there were advertisements. 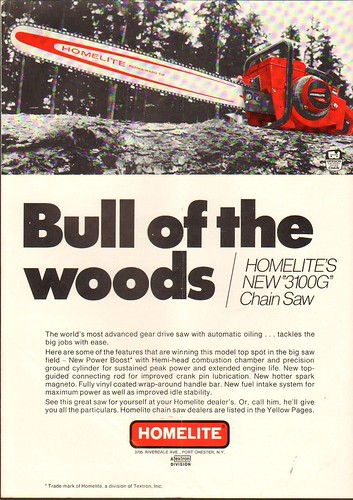 3100 Bull of the Woods 3100 Bull of the WoodsFor whatever the reason, they weren't around for long. By 72/73 it seems they were no more. The Homelite that is arguably the most powerful of all time was only around for somewhere around 2 years at the most. Never heard a definitive answer why they were so short lived. It's hard to imagine it was as simple as cost. They were a small fraction more expensive than an 1130 and these things were around up in the 80s, maybe even early 90s. Maybe there were some design issues that caused failures. Maybe it was a business decision to push sales of direct drives like the 2100. Whatever the reason, it added to their rarity and desirability. |
|
|
|
Post by lesorubcheek on Aug 5, 2018 16:51:24 GMT -5
If you're into these saws, pretty sure you've asked yourself how difficult it'd be to make one by morphing a 2100 and a 1130. It's true there's lot's of shared parts with these and the 3100. There's a few items though that make it pretty much impossible. Starting off with the gear drive housing. Left is a 3100 and on the right is an 1130. Notice the differences in the area which holds the crank bearing. 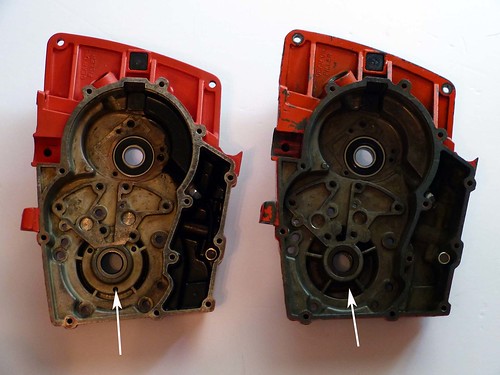 P1030628 P1030628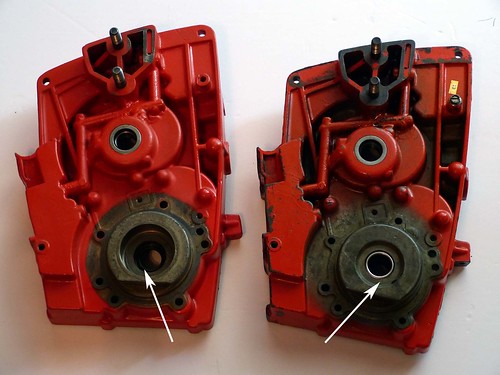 P1030629 P1030629So, unless you can find an A-67472 gear housing, building a 3100 is gonna be tough to get started. Another nice little difference is the idler post. Notice the location of the bolt closest to the post. Left is for a 3100 and right for an 1130. 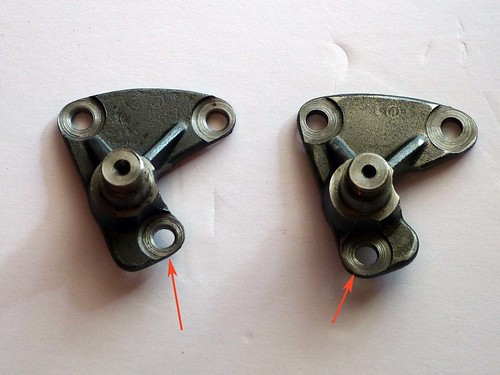 P1030630 P1030630 Since the mounting hole had to be moved out to accommodate the bigger diameter bearing, the bolt location on the post had to also be relocated. That's the difference in a 59259-1A (1130) and a 59259-2A (3100). One example where just looking at the 5 digit part number can be a big problem! |
|
|
|
Post by undee70ss on Aug 5, 2018 16:52:09 GMT -5
Any pics of your saw? I only have one 3100G also.
|
|
|
|
Post by lesorubcheek on Aug 5, 2018 17:04:12 GMT -5
It's in a few hundred pieces at the moment.  I bought it from someone who was a member here at HoH. Don't think he's been on for a while. Great person. Here's a pic he sent when he was in the process of selling it. 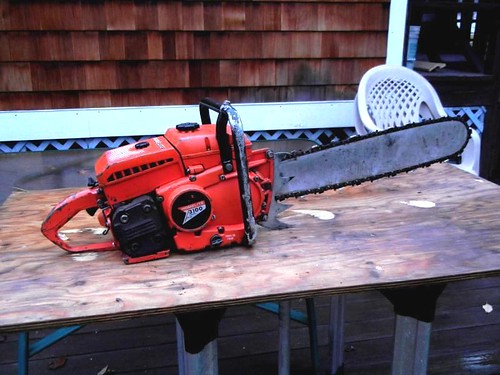 Homelite 3100G 1 Homelite 3100G 1 |
|
|
|
Post by undee70ss on Aug 5, 2018 17:11:07 GMT -5
I remember seeing that saw before!!! Great find!
|
|
|
|
Post by lesorubcheek on Aug 5, 2018 17:35:20 GMT -5
|
|
|
|
Post by tjthechainsawmech on Aug 6, 2018 8:16:25 GMT -5
In for this one
|
|
|
|
Post by scotts2000 on Aug 6, 2018 18:22:57 GMT -5
Yep another must have in the collection. Great info in this post
|
|
|
|
Post by lesorubcheek on Aug 6, 2018 20:29:44 GMT -5
Thanks everybody. Next hard to find, one of a kind part on a 3100 is the crankshaft. Please forgive the bearings still on the 3100's crank, but they're in pretty good shape and I haven't decided if I'm gonna replace them or not. Here's a comparison. 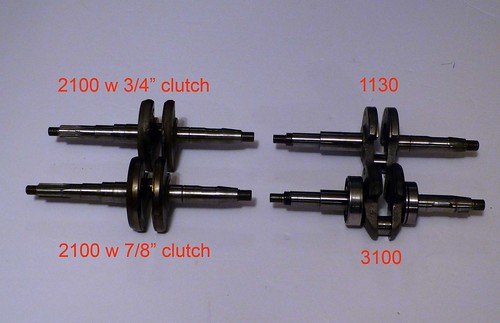 cranks cranks An 1130 is virtually identical on the PTO side of the crank, but as you start looking in the other direction, it has a shorter stroke, different rod journal diameter, and the timing for the point lobe and flywheel key are different. Things work out OK going on the flywheel end for 2100 (Standard and Super) cranks, same ignition timing, and moving inward, same stroke, rod journal, but looking at the PTO side it's very different with the splines for the clutch. There's also the 2000/Super 2000 and 2100 (plain, not Standard or Super) cranks to consider. The 2000/Super 2000 use the flywheel and ignition setup as used by 1050/1130s, so the point lobe and flywheel key immediately disqualify it as a 3100 substitute. The original 2100 will probably be as close as you could get. I think I have one in the stash, but couldn't find it for taking a pic. One difference will be the reduced diameter on the PTO side about an inch or so from the bearing. The drive gear of the 2100 auto oiler slides in there. It may be that a bushing could be milled for this crank than would make it a substitute, but without measuring everything, that's just speculation. Anyway, finding a 2100 crank has just a hair better odds than finding a 3100 crank anyway, so doesn't make much difference. |
|
|
|
Post by lesorubcheek on Mar 5, 2019 21:40:01 GMT -5
Sorry for the long departure everyone. Hurricane Michael made life really interesting around here, so been crazy busy. I'll try to get back to this project, but it may still be a little while.
Dan
|
|
|
|
Post by lesorubcheek on Jun 26, 2020 19:12:03 GMT -5
Alright, better than a year has passed, but figured I'd better get in gear working on this or it's never gonna get finished. Decided it'd be best to go ahead and put new bearings even though the originals were in pretty good shape, but since it is the only 3100 I'm likely to ever come across. There's a snap ring that has to be removed on the flywheel side bearing, and then just a matter of using a bearing separator.  With the bearings off, thought it's be nice to take some dimensions. I had originally thought the crank may be the same as an 1130 on the pto side, but turns out even here there's a difference. The 3100 has a slightly thicker section the bearing slides over where the 1130 is uniform. Anyway, here's rough dimensions. 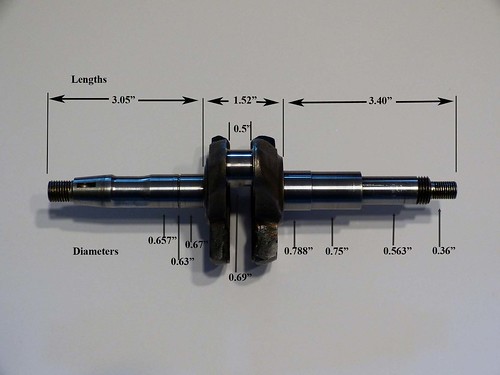 Using the standard "crank in the freezer, bearing in the toaster oven" technique, bearings went on easily enough. I used short pipe that rests on the inside part of the bearing to tap them home. The ring groove on the flywheel side bearing goes toward the rod journal. Make sure to remember the snap ring on the flywheel side to lock the bearing on the crank.  Next, put a new seal in the crankcase.  I put the crankshaft with bearings in a plastic bag, stuck it in the freezer and used a heat gun to warm to crankcase, covering the new seal so it wouldn't get cooked. Light wipe of oil on the seal and then assembled. Used a small punch to give a few taps on the outer part of the bearing race until it seated.   |
|
|
|
Post by lesorubcheek on Jun 26, 2020 19:37:11 GMT -5
Next step is to secure the flywheel side bearing to the crankcase. Special thickness washers and screws are used. The edge of the washer slips into the ring groove on the bearing and the screw holds it.   Before joining the crankcase to the gear housing, I'll install the manual oiler bellcrank and guide. Easier to tighten 'em up without the crankcase. Also install a new seal on the gear housing.   A new lightly oiled O-ring and it's about time to join it together.  Used the heat gun once more, this time on the gear housing side where it'll receive the bearing, of course protecting the new seal. A light wipe of oil on the seal and it slips together fairly easily. Torqued the 5 bolts to 80 in-lbs.  Now time to test the seals. Many thanks to sawnami and Brennan for the recommendations for rubber in the thread test-setup-checking-crank-seals, it worked much better than an old inner tube. So here's the setup.  About 10 minutes at 7 psi or so (pegs the gauge)  and about 10 minutes at 8 or so on the vacuum. No leaks so hopefully seals are fine.  |
|
|
|
Post by sweepleader on Jun 27, 2020 19:55:33 GMT -5
Fantastic pictures and information, thanks!
|
|
|
|
Post by lesorubcheek on Jun 28, 2020 19:17:14 GMT -5
Fantastic pictures and information, thanks! Thanks Dan. When I was younger, it was a little intimidating working on a saw. Always thought it'd be nice to have someone walk through the details. These days you can find youtube videos for just about everything. Don't feel like much of an actor for doing videos, but figure at least I should take some pictures to share how to play with 'em. Haven't done alot more, but did work on the oiler parts. Got a new manual oiler plunger since the original was worn down a bit. Here's it with the ball valves and caps. The balls drop in first and seat against the housing, the springs sit on top of the balls and the caps hold 'em in place with just a little pressure on the springs.  And here's how it looks installed. Oiled the plunger really good but still had to work it to get a nice smooth motion.  Here's the parts of the auto oiler. Always impresses me to see how the cam and plunger system works on these. Someone had some brains to come up with this design. The auto oiler was stuck when I got the saw. The teeth on the plunger were actually eat down on a spot, so found a replacement to put back on. This one turns very smoothly.  So here's the oiler with fresh oiled o-rings, a new worm gear, sprocket shaft and spacer. The spacer slips inside the seal lip from the outside and is what actually seals the gear case at the sprocket shaft. Sit the worm gear in position and then slide in the sprocket shaft. A few light taps and it goes through the bearing, no need to heat anything.  Here's how it looks installed.  and outside with the spacer in place.  |
|
|
|
Post by lesorubcheek on Jul 1, 2020 17:53:45 GMT -5
The next step is the piston and cylinder. Thought it's be good to show a piston comparison of the series over time.  The left most piston was used on the 2000. Notable are that it used Rulon plugs for retaining the wrist pin so there's no groove for clips. Also, the ring's alignment has a single pin so the ring gaps are in line rather than staggered. Next is the Dykes or head-land ring used on the Super 2000 and the original 2100. Next is the piston used on the 2100 S (standard) and the 3100. It's similar to the original 2000 piston, but has grooves for the wrist pin clips and it has staggered pins to align the rings. Far right is the thin ring used on the Super 2100.
Another notable item regarding these pistons is that the 68102 and 69241 have a machined flat boss inside where the wrist pin slides through so it uses the connecting rod with upper thrust washers. The 65752 and 67469 don't have this area machined flat and needs to use the earlier style connecting rod that's bushed on the crank end.
I thought alot about putting a thin ring in this, mainly because I have more spares, but decided it really needs to be original. If I had 4 or 5 3100s laying around waiting to play with it may be different. Another interesting point regarding the pistons is that they all have the same number cast inside. Look inside and they all have a 64159.
 So with the piston selected, here's the parts that'll be going in. I remove the rings until it's ready to receive the cylinder so they don't get dinged.  |
|
|
|
Post by lesorubcheek on Jul 1, 2020 18:10:32 GMT -5
Here's the rod assembled onto the piston, and clip in place. The closed end of the wrist pin faces exhaust, so it's opposite the side of the piston that has the ring alignment pins. New rod bearings are also gonna be used. The upper bearing on the rod was in great shape so I just cleaned and oiled it.  One of the best things about using new bearings is you don't have to fool with trying to get them to stay in place with grease. The wax holds 'em together very well and makes it easy to fit the rod. I do oil the surface of the crank before wrapping them on and oil the rod well too.  ... and here's the rod and piston installed on the crank, making sure the ring gaps are on the intake side with closed end of wrist pin on the exhaust side.  For the cylinder, I have a few NOS ones, but the original is in such good shape it seems a shame not to use it. Trying to save the new ones for some upcoming projects. Left is a new one and right is the original.  Here's the cylinder bore. 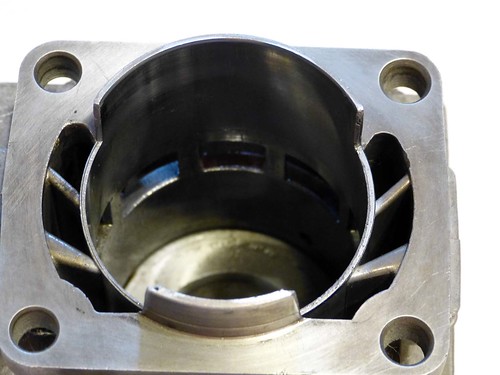 Decomp parts that need to be assembled. Getting that spring on is always a job.  |
|
|
|
Post by lesorubcheek on Jul 1, 2020 18:23:45 GMT -5
Here's the cylinder ready to go and a new cylinder gasket.  Gasket in place, rings installed and oiled and a piston support holding it in place. The support came with a set of ring compressors and works very well. 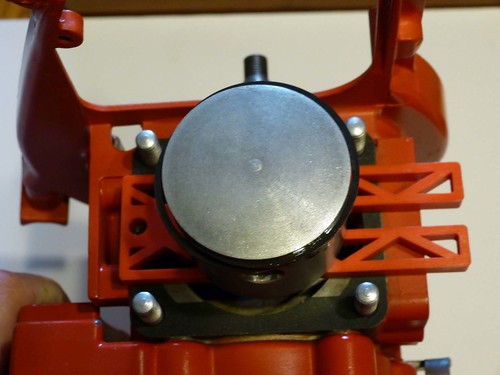 Here it is with bolts snugged but not tightened yet.  Tightening these nuts can be tricky since they're difficult to get too. These are the 2 wrenches I use. The lower Husky has the edge ground down to make clearance a little easier. The upper proto is thinner profile so it slips in where a normal wrench it too snug. After tightening the nuts, bend the locking tabs over to help lock 'em in place. 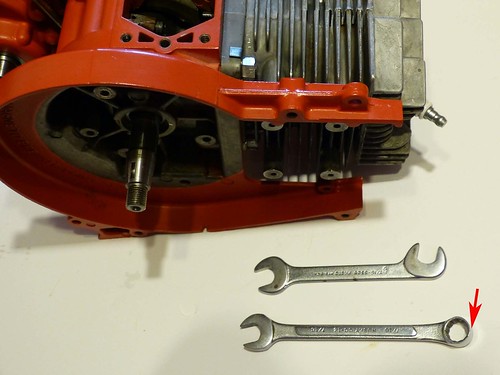 I'm not going to do another vac/pressure test since I already tested the seals and the decomp on these almost always ends up with a slow leak anyway. Went ahead and stuck in a spark plug and putting a plastic bag over the intake to keep the insides clean. |
|
|
|
Post by lesorubcheek on Jul 2, 2020 13:03:54 GMT -5
With the piston/cylinder in place so the "rope trick" can be used to lock the crank, it's time to install the clutch and gears. Had to decide whether to use the 3:1 or the 2:1 gear option. The saw came with the 3:1 larger gear. Most trees around here are 3 or 4 feet at the most, so gonna opt for speed and go with the 2:1.  The idler gear post has to be installed first in the appropriate position. The case has markings to see which spot for either 3:1 or 2:1.  The post is held with 3 bolts. I've seen some 1130s that have short bolts installed in the unused position. It'll keep oil and sludge outa the threads, but they're not required and there weren't any on this saw.  With the post in place, the idler gear and bearing can be installed. The bearing is held inside the gear with snap rings on either side. The original was in great shape, so reusing the bearing and gear. It's a tight fit. Don't want to heat it much because it may damage the bearing and grease, but put it at 120 degrees for about 10 minutes and then used an old piston pin that fit the inside race to knock it on. The nut is left hand threads.  |
|
|
|
Post by lesorubcheek on Jul 2, 2020 13:25:41 GMT -5
Now for the clutch. The original spider had one leg broken.  So new spider, might as well use new shoes and springs.  Assembling a clutch may be easy once you know how, but I can remember when it had me baffled. I think it was someone over at Arboristsite that explained it many moons ago, so here's how I do it now. First, roll one spring onto the spider. I start with the spot where the spring is joined, press it onto the spider, then press and slightly roll the spring around on both sides. A small screwdriver can help if your fingers aren't strong enough. Some springs can be very tight. After the one spring is on, install the shoes by sliding in and up onto the spring.  After all 6 shoes are on the spider, flip it over and then press on the second spring in the same way as the first. It may be a little tougher since with the shoes there's a little less slack, but bear down and roll it and it'll go on. With the spider/shoes/springs assembled, here's all the parts. A washer goes on the crank first. Next oil the bushing and slip in on the crank. The drum goes next over the bushing. Another washer and then the spider is ready to spin on. 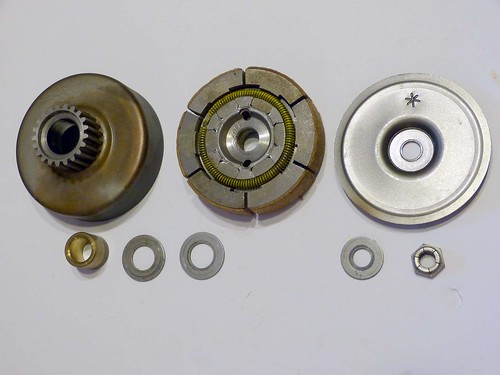 On the subject of gear oil, I had read some information awhile back regarding debates over using gl5 rated gear oils with bronze bushings. Apparently some of these oils would attack the bronze, so people were saying you'd best use gl4 rated oils where there's bronze parts. Not sure this is still relevant with newer gl5 oils or not, but to play it safe, I've been using gl4 rated gear oils in all my gear drives since I heard about this.  |
|
|
|
Post by lesorubcheek on Jul 2, 2020 13:44:31 GMT -5
With a rope in the spark plug hole acting as a crank stop, it's time to torque down the clutch. The Homelite clutch tool is obviously perfect here. The spider has left hand threads.  After the spider is tightened, the clutch cover goes on with a washer and nut. This nut is right hand threads. Finally, a snap ring is all that's needed to install the driven gear.  One last little detail was the oil filter clunk for the auto oiler. For the gearcase, that about wraps it up other than the cover and adding oil. 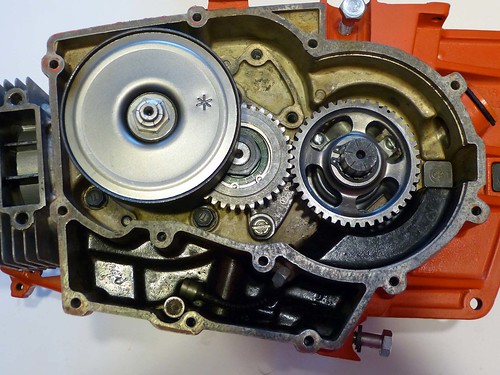 Oh, one more thing worth mentioning is the auto oiler's design has the feature that it'll only oil when the clutch is engaged. This isn't very common on Homelites. The only other model that comes to mind is the 540/8800 which had a groove on the sprocket that turned the oiler worm gear. There may have been a few other later models, but most saws had a worm driven on the crank, so if the engine was running, it'd be pumping. Don't know if this was intentional or if it happened by accident, but it's a neat feature on the 1100, 1130 and 3100 saws. |
|


