|
|
Post by daniel72 on Oct 3, 2017 7:55:44 GMT -5
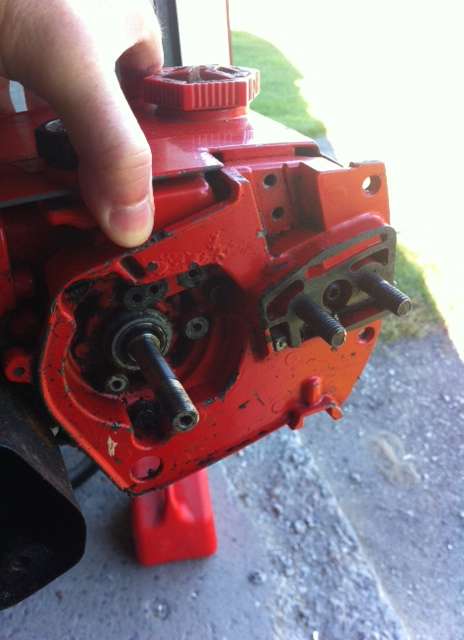
I'm having a little trouble with my old XL-1.
I want to disassemble the whole thing but I'm stucked! The clutch, the pump and the flywheel are off the saw. I don't know how to get the side plate detached from the fuel and oïl tank. When I remove the screws, the plate rotates a bit, but it won't come off. Where do I go from here? Could it be the crank seals that keeps it together?
Thank you for your help.
|
|
|
|
Post by sweepleader on Oct 3, 2017 8:51:03 GMT -5
|
|
|
|
Post by daniel72 on Oct 3, 2017 10:54:54 GMT -5
the manual seems to be correct with a few exceptions.
We see the parts on page 3. The drivecase (what I called the side plate)seems to have an assembly that can only be reached from the inside. I cannot split the case as at least one retaining screw is out of reach. It is under the drivecase! It seems to be the part number 9 or 10 on the figure.
I'm afraid to try to force it as I may brake the drivecase.
Any ideas!
|
|
|
|
Post by sweepleader on Oct 3, 2017 11:19:36 GMT -5
I see the bearing retainers you mentioned, did not notice them before. SXLs have a similar arrangement, you have to take the other side off first to get at the screws.
Probably best to wait for someone more familiar with this model. Sorry, but they will be along.
|
|
|
|
Post by onlyhomelites on Oct 3, 2017 21:01:30 GMT -5
Welcome to HOH! You've got some more disassembly I'm afraid. The fuel tank needs to come off before you can go any further. There's (3) screws that should be easily visible on the flywheel side and the screw between the bar studs is the final one. Then you have to take the cylinder head off. After that, remove the connecting rod...be very careful on this step as there are 28 little needles that will fall everywhere when you remove the bearing cap. After that, you can separate the drive case from the crankcase and the crankshaft will stay with the drivecase. Then you will have access to the screws that retain the crankshaft to the crankcase. I'm afraid there are no shortcuts here...this is the only way to do a full teardown.
|
|
Deleted
Deleted Member
Posts: 0
|
Post by Deleted on Oct 3, 2017 22:25:01 GMT -5
Welcome to HOH! You've got some more disassembly I'm afraid. The fuel tank needs to come off before you can go any further. There's (3) screws that should be easily visible on the flywheel side and the screw between the bar studs is the final one. Then you have to take the cylinder head off. After that, remove the connecting rod...be very careful on this step as there are 28 little needles that will fall everywhere when you remove the bearing cap. After that, you can separate the drive case from the crankcase and the crankshaft will stay with the drivecase. Then you will have access to the screws that retain the crankshaft to the crankcase. I'm afraid there are no shortcuts here...this is the only way to do a full teardown. I was looking over the XL-1 parts manual (graciously supplied by onlyhomelites) and to me it looks like the 4 screws are on the drive case side, maybe I've got the wrong screws. On page three of both versions it appears to show number 28 or 57, depending on which revision, three hex head 12-24 x 5/8" screws and one screw, number 27 on both manuals, and just listed as Screw-fil., Drive case retainer. Did I completely misread the IPL? I may be misunderstanding the disassembly sequence in that the fuel tank side must come off first to remove the cylinder and rod. Thanks, Alain EDIT: I think I see where I missed it, it looks like on page three, part number 1 are three retaining screws, the screws I was looking at look like they are in the same holes |
|
|
|
Post by onlyhomelites on Oct 3, 2017 23:10:12 GMT -5
I may be misunderstanding the disassembly sequence in that the fuel tank side must come off first to remove the cylinder and rod. It is the sequence...there's one cylinder nut than can't be removed with the fuel tank in place, hence the need to remove the tank first. You are correct about the (3) screws total that hold the drivecase to the crankcase and the 4th screw holds the drivecase to the fuel tank. |
|
|
|
Post by daniel72 on Oct 4, 2017 8:22:04 GMT -5
Thank you for the explanation. I will get back at it this weekend.
|
|
|
|
Post by Supercharged86 on Oct 4, 2017 20:37:04 GMT -5
In the beginning, the three special flat top screws behind the flywheel that hold the tank to the crankcase were #2 Phillips; these became easily stripped if the screw was uncooperative. These were eventually changed to torx, which are a little more robust. An impact drill driver works great on these. Good luck with your project.
|
|
|
|
Post by daniel72 on Oct 14, 2017 13:06:01 GMT -5
Thank you onlyhomelites, I followed your procédure and everything went well.
Daniel
|
|


