Deleted
Deleted Member
Posts: 0
|
Post by Deleted on Apr 6, 2018 16:31:14 GMT -5
I tore down my 360 today to put a new pulse line on & a new boot in.I got the pulse line routed no problem.I'm having trouble figuring out how the boot gerts assembled in since the old boot was non-existent.I know the bottom plate goes on,but does it go on over the boot & then the carb plate on top of that.What holds the carb plate in place?I tried looking at IPL's but my eyes are going crazy trying to figure things out.I have pics here of the carb plate off & just sitting on the other plate & boot. 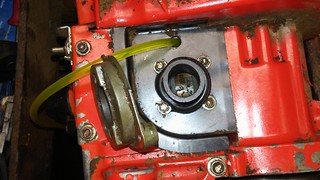 20180406_182520 20180406_182520 by edju1958, on Flickr 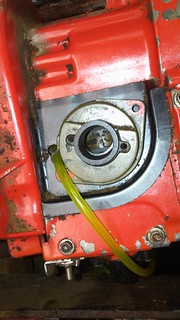 20180406_182453 20180406_182453 by edju1958, on Flickr |
|
|
|
Post by lesorubcheek on Apr 6, 2018 18:00:47 GMT -5
Not sure which IPL you're referencing, but hopefully the terminology will be the same in all. So, to get to the pulse line attachment on the nipple on the cylinder, I assume you removed the air deflector. It's the metal plate with 4 screws that sits on top of the intake manifold and has an opening for the pulse line to pass through it. So, you'd reattach this after the pulse line was slipped over the nipple, other end though the grommet in the air deflector, and tighten the 4 screws. The lower end of the boot is then slipped around the neck of the intake manifold. Next is where the garter spring comes in. It squeezes around the lower section of the boot where it mates to the intake manifold and maintains force for a good seal. Easiest way I've found to get it on is to roll it around the boot after the boot is already in place. Other's may have found a different technique. I've tried putting the garter on the boot prior to fitting the boot over the intake manifold, but never had luck.
Don't feel bad if this causes some difficulty. It wasn't an easy step for me. Only after I tried rolling it over the boot with the boot already over the manifold did it kinda get easy. OK, so now you have a boot attached on the bottom, but nothing above. Next you'll attach the carb connector flange. This has two threaded holes in the center to attach the carb, two threaded outer holes that secures the flange to the handle assembly, and you'll notice one hole on the outer edge. This hole is for the pulse line to pass through as it feed up, eventually to the carb. Hold the flange so it's wide end is facing downward. Feed the pulse line through the hole on the outer edge, and pull down until it's close to the boot. You'll next fold the top of the boot so it'll pass through the center of the flange. Pass it up and through, and pull the pulse line on also to take up slack. Work the top of the boot so it's unfolded and fits around the inside of the flange. I hope these words make sense... it's alot easier to show somebody than try to describe in words. Anyway, if everything else is ready, reattach the handle/tank assembly to the anti-vibes. As you do, make sure the pulse line is up and inside the carb chamber. Rotate the flange so the 2 holes align with the handle's opening and attach the two screws that hold the flange to the handle assembly. Before attaching the carb, there's a bushing that sits inside the top of the boot, and a gasket on top of it. The carb then sits on top and screws attach it to the flange. Don't forget the big Hi/Lo grommet for the carb since it needs to slide in from the top, so bets to position it on the needles as the carb is slid in. Attach the pulse line, fuel line, all the other stuff such as linkages, and whatever else.
Dan
|
|
|
|
Post by lesorubcheek on Apr 6, 2018 18:05:50 GMT -5
You know, I've been typing the reply for a bit, but I swear I didn't see the pics when I first started to reply. OK, so everything looks good, assuming you rolled the garter spring around the base of the boot to hold it to the manifold. Those two outer screw holes on the flange will line up with openings on the handle/tank assembly. Attach the two screws and that holds it in place.
Dan
|
|
|
|
Post by lesorubcheek on Apr 6, 2018 18:19:23 GMT -5
Here's what the flange looks like attached to the handle assembly. Note only one screw is attached here. You can see where the pulse line would come through next to the left screw. This was just sitting around, obviously when ready to assemble the flange would first be removed, fitted to the boot and the engine assembly passed up and mated as a unit to the tank/handle assembly. 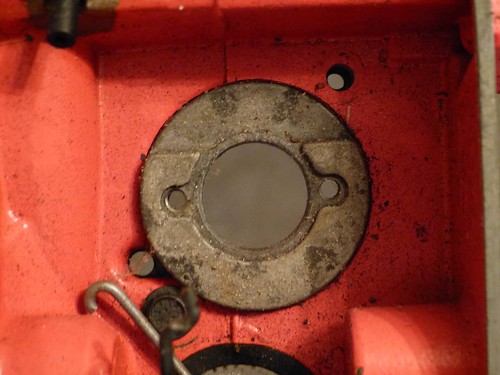
Dan |
|
Deleted
Deleted Member
Posts: 0
|
Post by Deleted on Apr 6, 2018 18:30:57 GMT -5
I swear that I'm half brain dead.Lol That's where I got lost - the carb plate goes on after the handle reattaches.You were probably typing when I loaded the pics on here.Lol I put up the post first,then I added the pics.Thanks a bunch Dan! I think you told me this was the first saw you tore into.I can see why,it's a very easy saw to work on,nothing really difficult - AS LONG AS I CAN REMEMBER! Lol I won't be putting the carb on just yet,gonna rebuild it first.
This post was made with due respect to all members involved.
|
|
|
|
Post by lesorubcheek on Apr 6, 2018 18:41:47 GMT -5
Yea, I thought I was going crazy or something. Lol. I could swear there were no pics, and then there they were. Thanks for explaining, maybe I ain't senile yet! Yea, a 350 was my Dad's saw that started my addiction. It's a little different, for instance there's only 2 screws that hold the intake manifold, but pretty much the same as a 360.
Dan
|
|
Deleted
Deleted Member
Posts: 0
|
Post by Deleted on Apr 6, 2018 19:29:56 GMT -5
That's my problem - I'm too nice of a guy.I shouldn't have explained anything & see what happened.Lol Poor Dan woulda been in a rubber room somewhere talking about the pics that weren't there.Lol I just couldn't do that though.The more I think about it,the funnier it gets.Thanksd for the help though Dan,it's greatly appreciated!
This post was made with all due respect to the members involved.
|
|
|
|
Post by lesorubcheek on Apr 6, 2018 20:30:36 GMT -5
I bet a rubber room might be fun! It's those straight jackets that look like they may be a little uncomfortable though... make it hard to drink a Dr. Pepper with my hands tied behind the back. lol. Couldn't run a saw either with no free hands.
Dan
|
|

