Deleted
Deleted Member
Posts: 0
|
Post by Deleted on Mar 4, 2018 21:54:20 GMT -5
I've got a 150 Auto that was missing the plug boot when I got the saw.I thoughtthat I'd just get a new plug boot & screw & put it together & I'd be good,not so much.When I went to put the plug wire on the plug I had to really stretch the wire to attach it & it lays tight on the cylinder.I went to take the wire off & found it very difficult to do so.I know that coil/spark plug wres can be spliced successfully,but how.I only need about 2 - 3 in.more.
|
|
|
|
Post by undee70ss on Mar 4, 2018 22:04:28 GMT -5
I've got a 150 Auto that was missing the plug boot when I got the saw.I thoughtthat I'd just get a new plug boot & screw & put it together & I'd be good,not so much.When I went to put the plug wire on the plug I had to really stretch the wire to attach it & it lays tight on the cylinder.I went to take the wire off & found it very difficult to do so.I know that coil/spark plug wres can be spliced successfully,but how.I only need about 2 - 3 in.more. See page 25 in the 150 service manual. |
|
|
|
Post by undee70ss on Mar 4, 2018 22:06:23 GMT -5
You can replace the wire. I would not bother trying to splice a piece of wire.
|
|
Deleted
Deleted Member
Posts: 0
|
Post by Deleted on Mar 4, 2018 22:07:08 GMT -5
Define successfully lol. I almost took a picture a while back in the old saw shop I went in in my old home town. Low and behold was a super 1050 sitting there, belonged to another customer was in for a carb rebuild. It had a yellow wire nut about two inches from the spark plug boot. They said it came in like that and ran fine so they didn’t bother with changing it. I wish I had taken a pic so I could post it but I felt it was a bit inappropriate to do so.
|
|
|
|
Post by sweepleader on Mar 4, 2018 22:14:20 GMT -5
If it can be done, it will be done, even with wire nuts, eh?
|
|
Deleted
Deleted Member
Posts: 0
|
Post by Deleted on Mar 4, 2018 22:22:15 GMT -5
Lol yea as much trouble as I had with coil and wire on my C-72 I saw that wire not job and said to myself now why didn’t I think of that! And then I followed that thought with my, that’s awfully close to the trigger which would put that close to your finger, if that arcs while running wide open it won’t feel good at all and who knows what you would hit snatching back from that
|
|
Deleted
Deleted Member
Posts: 0
|
Post by Deleted on Mar 4, 2018 23:17:03 GMT -5
It sounds like something my dad woulda done.Lol
|
|
|
|
Post by sawnami on Mar 5, 2018 0:19:21 GMT -5
This would glue it together. Using both products makes a durable bond.  |
|
Deleted
Deleted Member
Posts: 0
|
Post by Deleted on Mar 5, 2018 18:19:17 GMT -5
This is what happens when I listen to people tell me to replace the coil wire & not splice it.That wire was epoxied in there real good.I don't know if this is salvageable or not. 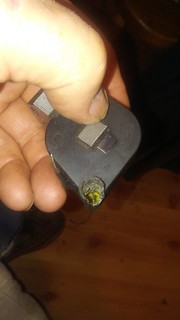 20180305_125839 20180305_125839 by edju1958, on Flickr 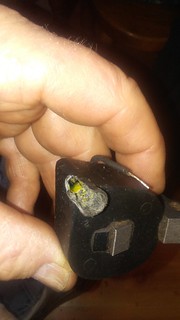 20180305_125756 20180305_125756 by edju1958, on Flickr |
|
|
|
Post by sweepleader on Mar 5, 2018 18:44:53 GMT -5
Looks pretty bad but I bet it can be salvaged. You need to make a solid connection between the wire conductor and that post in the bottom. I have never seen one break out like that but you can fill in around the insulation with epoxy. Get the wire in there where you want it, connected, and arrange the coil so the epoxy will stay in around the wire. It will likely take a couple of coats to fill in the broken out part. That is unusual as the wires generally just break loose from the glue and unscrew.
It looks like the post broke off down in the bottom, is it still stuck in the wire that came out?
|
|
Deleted
Deleted Member
Posts: 0
|
Post by Deleted on Mar 5, 2018 19:53:49 GMT -5
There should still be a pointed "barb"still in the coil,it was there last time I looked.
|
|
|
|
Post by sweepleader on Mar 5, 2018 20:08:36 GMT -5
Then you screw the new wire on to the barb and glue it in. No problem. Clean out the socket area for the wire with a pointed Exacto knife or something similar so there is proper room for the new wire. Use only solid wire core no carbon or fiber.
I would put enough glue/epoxy on to replace the broken out plastic on the side, strengthening the wire mount and sealing water out.
:{)
|
|
Deleted
Deleted Member
Posts: 0
|
Post by Deleted on Mar 6, 2018 8:34:54 GMT -5
The old wire didn't screw out as everyone thought it would,I had to dig it out,that's why ther side wall is destroyed.I bought a new wire that was made for this application from Leon,part #68629.There are no threads to screw the new wire in.
|
|
|
|
Post by jerseyhighlander on Mar 6, 2018 9:47:49 GMT -5
I agree, looks worse than it is. Just proceed with a little finesse. When they say "screw" it in, I think they just mean twist as you push it down in to the socket, maybe with a finger on the outside where it's broken, keeping it in what's left of the socket.
Could use a piece of plastic or cellophane over cardboard to make a small form to cast the epoxy into. Clean off the outer plastic with a acetone or prepsol to help it adhere well. Regular clear epoxy, not the stuff with metal added.
Maybe use a small cable tie around the top of that socket for extra insurance.
|
|
|
|
Post by sweepleader on Mar 6, 2018 10:47:30 GMT -5
Jersey has good advice there. The stud at the bottom of the pocket is normally threaded, not the pocket. Make the pocket big enough so the wire insulation will go in without a lot of trouble. Do not go too far toward the coil, somewhere in there is wiring you do not want to hit. Just cut away the old insulation and glue.
|
|
Deleted
Deleted Member
Posts: 0
|
Post by Deleted on Mar 6, 2018 17:05:41 GMT -5
OK guys,you've been very helpful with this coil thread,but there's one thing I need to know yet - what brand of epoxy should I use?There are the kinds where you mix two equal parts together & apply.I haven't used any in many yrs.I also have some Permatex blue that I've used on gaskets in gas tanks,it takes a while to cure,but it's good stuff.Or is there something else to use that's better?
|
|
|
|
Post by sweepleader on Mar 6, 2018 17:29:23 GMT -5
Two part, clear, sets hard. Fast or slow does not seem to matter but wait for the time called for and keep it warm (70ish) for that time. Do not use the stuff that has metal in it. I use Devcon 5 Minute Epoxy in DevTube (two tubes like syringes twined together), part number 14250, its clear. One push gets two parts in equal measure, mix it for one minute and get it in place. No moving it for at least 10 minutes, let it harden for a couple of hours at room temp. You can handle it after 10 minutes but don't stress it. Do not touch one tube opening with the other as it will eventually harden the entire tube. If you keep them apart it seems to last a very long time, still good after a year. One package does a lot. I stir with Popsicle sticks on a clean card. Dollop the size of a nickel does most jobs. Put on two layers if in doubt, ads 15 minutes to the process.
|
|
Deleted
Deleted Member
Posts: 0
|
Post by Deleted on Mar 6, 2018 17:33:29 GMT -5
OK,sounds good.Another silly question - where do you get it?
|
|
|
|
Post by jerseyhighlander on Mar 6, 2018 19:07:15 GMT -5
Any decent hardware store should have it and a good selection of other stuff if not what Dan recommends. I've used the Devcon with good results. Loctite makes some good epoxy too. Just degrease as much as possible before you get going.
|
|
Deleted
Deleted Member
Posts: 0
|
Post by Deleted on Mar 6, 2018 19:54:12 GMT -5
That coil is pretty much degreased now,but I'll go over it with some acetone & a clean rag to get rid of any residue that might be left.I think it's been almost 40 yrs.since I've used epoxy glue successfully.I used it on a gas tank on my car & it held up for long afterwards.
|
|


